You must be knowing that for any particular website, the most important factor is to bring it to a Rank in Search Engine Result page isn’t it?
Because if it doesn’t rank properly in Search Engine then you can never expect a huge traffic to your website.
And generally to improve the search Results or Ranking you must be going for various techniques of Search Engine Optimization like On-Page and Off-Page SEO but are you sure that you have Optimized your website technically?
If not, then implement these 7 Technical SEO Checklists which will not only help you to optimize your website technically but also improve your search results.
But before going further ahead, let me clear you one thing that in this whole Article, you will find WordPress Website Technical Optimization because nowadays you will find most of the website are designed in WordPress.
And through WordPress you can design beautiful websites that too with zero coding knowledge.
So now lets understand detailed about this Technical SEO and its implementation in WordPress Website.
What is Technical Seo?
Technical Seo is used to optimize our website technically so that Bots or Spiders can crawl your sites properly and can index the content.
Apart from On Page and Off page Seo optimization, Technical Seo is also very important.
Because it not only helps to rank organically but also increases the visibility of website.
So now lets discuss about these 7 Technical Seo Checklists and understand how to implement this to your website?
1. Site Loading Speed

Suppose any visitor visits our website and it takes huge time to open up the site then definitely the user will feel irritated. And might prefer other website which opens up within a fraction of seconds.
Now you must be getting how Site Loading Speed is important for any website.
There are various tools through which you check the loading speed of your website. So go ahead and test your website now using the tools below.
- GTMetrix
- Google Page Speed Insights
- Pingdom Website Speed
Now lets check
How to improve this Site Loading Speed?
1. Image Compressor
Basically one of the major factor which slows down any site are the high resolution and uncompressed images.
So you need to follow the steps to improve the loading speed like:
- You have to Optimize the images so that it can be loaded faster.
- Do not use PNG Images.
- Use Proper dimension images.
Now you can use various tools to compress your images like:
- Image Optimizer
- JPEG Optimizer
- Kraken.io
- Optimole
- Optimizilla
2. Leverage the Browser Cache System
Whenever you visit any website for the first time, then the browser stores some information about that website so that when the visitors returns to that same website for the second time it can load faster.
So when you visit it for the first time it stores all the images, logo and videos. For the second when you visit only the content will be loaded.
There are various Plugins which you can implement like:
- w3 total Cache
- wp super cache & code
- wp fastest cache
3. Minify CSS/JS Code and Remove Unused Codes
Basically CSS(Cascading Style Sheet) used for styling and JS(Java Script) used to program logic for the page layout.
But sometimes due this you might face problem in site loading speed.
And using various tools mentioned above under Site Loading Speed you can minify them to a desired size.
Also you might face problem due to some Unused codes so you need to remove them.
In this way you make your website healthy and much lighter, so that you don’t face any issue regarding the loading speed.
2. Robots.txt

Robots.txt is nothing but a text file which is uploaded in the server in order to instruct crawlers whether to visit or not to visit a specific Page.
Certain instructions are written for this in order to allow or disallow Bots or Spiders otherwise they might crawl to your Irrelevant pages and will index them in the search Engine result Page which will create a bad impression of your website.
And none of your visitors will ever trust your site.
Apart from this, it also prevents your website from spamming and hacking.
So first make sure is Robots.txt file present in your website or not and you can check it in 2 ways:-
- Check it Manually
You can check it manually and path to check this: www.yourwebsitename.com/robots.txt
Example: www.dizitalsquare.com/robots.txt
- Check Using Tools
There are various tools through which you can check whether the websites has uploaded its Robots.txt file or not.
Following Tools are: robots.txt checker, Moz.com and through Google Search Console.
How to add Robots.txt File?
After knowing the path to check robots.txt file now let discuss to add this file.
Generally you can add this file in 2 different ways like:-
1) Write Instruction in notepad and Upload it in Server
- At First you can write the Instructions in the notepad and then can save it as robots.txt.
- Then in the control panel you have to click on Open File Manager.
- Inside Open File Manager Search for htdocs
- Under htdocs you have to upload this robots.txt file
Now you must be thinking what instruction to write?
So the instruction must be written like this as shown in the image below:
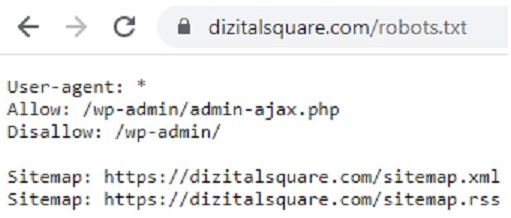
After User-agent a symbol * has been given which symbolizes all Bots and if you want to allow or disallow any specific bots then you can mention it after User-agent like
Example:
User-agent: Googlebot
Disallow: /wp-admin/
In the above example it is written Googlebot after User-agent which means only the google bots are not allowed to crawl in admin page and rest other bots can crawl the page.
2) Install Popular Plugins
You can install popular plugins like Yoast Seo and All in One Seo in which Robots.txt file is already inbuilt.
3. Sitemap.xml

Sitemap is a list of pages of website created for Users and Crawlers. So basically it gives a good navigation flow to all the crawlers and give them a proper direction.
And in order to check whether Sitemap is present for your website or not there are 2 ways:
- Check it Manually
You can check it manually and Path to check this: www.yourwebsitename.com/sitemap.xml
Like Example: www.dizitalsquare.com/sitemap.xml
- Check using Tools
You can also check using Popular Tools like SEOptimer , Sitemap Checker and can also check through Google Search Console.
After knowing the techniques to check the sitemap now lets discuss
How to Implement Sitemap.xml?
There are many possible ways to implement Sitemap so lets discuss one by one:
First Way
- Create a text file with a name as Sitemap and save it as .xml extension.
- Now you need to write certain instructions accordingly

3. After writing the instructions you have to upload this in Control Panel under htdocs similarly like Robots.txt file.
Other Alternative ways to add Sitemap
You can also Install and Activate various plugins like Yoast Seo and All in One Seo in which Sitemaps are inbuilt.
Or else you can use Sitemap Generator and in this tool you have to type the URL of your website. It will create the sitemap of your website.
After that you can download that file and can upload it in C-panel.
4. Accelerated Mobile Pages(AMP)

AMP is nothing but an HTML Tag for webpages that loads faster than normal pages in mobile phones.
So basically it impacts the high loading speed and Google gives high priorities to AMP pages on SERP.
How To Add AMP Pages?
Generally to implement this you have to Install and Activate Plugins in your WordPress developed Websites.
You can install Plugins like: AMP For WP, AMP by Google
In the search option after typing AMP For WP you will get many options so go according to the Users rating.
5. Redirection
Basically the use of Redirection comes for the outdated Content or Ads.
Like Suppose its been one month you don’t want to show that old content which is indexed by Search Engine rather you want that your users must visit your new content. So here you can use either 302 or 307 Code for Temporary Redirection.
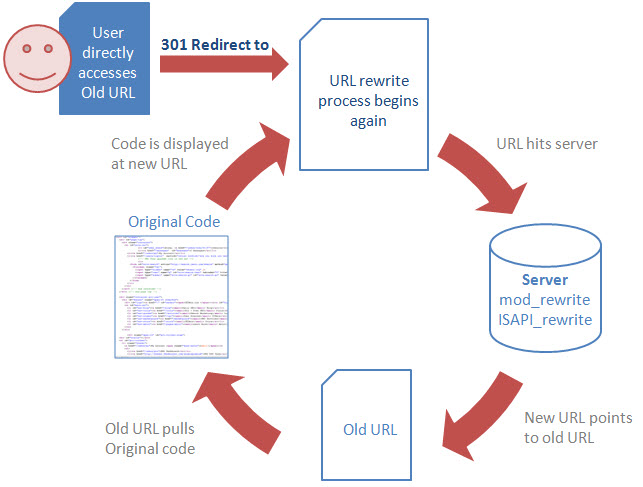
But if your page is permanently deleted and it is showing 404 Error so in this case you use 301 code so that it can permanently redirect to the working Page.
Now you must be thinking that,
How to Implement Redirection?
It is very easy to implement and for this you just need to install Plugins for Redirection.
After Installing the Plugin you need to Activate it. You will find Option Like Source URL and Target URL.
You need to enter the Old URL in place of Source URL and in place of Target URL you need to put the New URL which you want to show it to the Users.
6. Schema or Structured Data
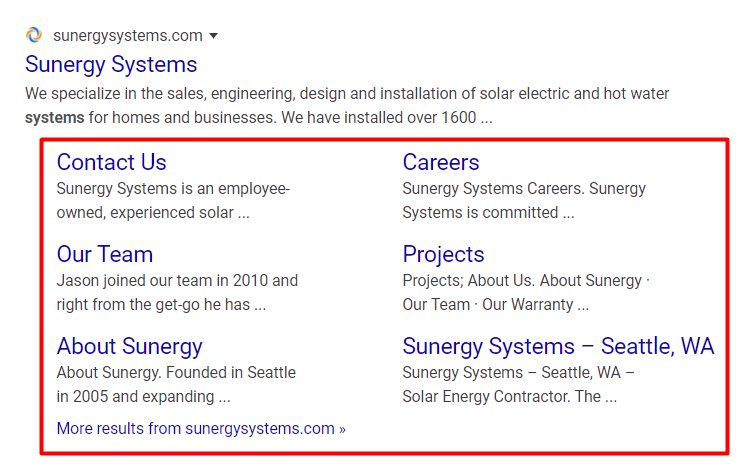
Schema is a markup language basically for Search Engine to understand the nature of the website and to create a proper Snippet on SERP.
Like for Business Websites you have to create Business Schema Snippet so that when Bots will crawl they will understand the following website is related to Business.
So Schema Markup for any Website is important because it improves the ranking of our website in Search Engine Result Page.
How to add Schema Snippet?
There are various WordPress Plugins available for Schema and below I have suggested some best of it:
- Schema & Structured Data for WP & AMP
- Schema
- Yoast SEO
- All in One SEO
So you just need to install and activate it. After that you have to go to the settings and have to give proper information of your site. Then save your details.
And Search Engine will take around 15 days to 1 month to create that proper snipper of your website.
7. Canonical URL

Canonical URL is basically used for Bots and Crawlers understanding and also prevent us from content or Page Duplicacy.
So lets understand this whole concept by taking an Example:
Like suppose if I take 3 URLS:
www.xyz.com
https://xyz.com
https://xyz.com
Generally the above 3 URLS are same means it will display the same content but Bots will get confused and will think all the 3 URLS are different versions of any website.
And it will display the same content in Search Result Page that too with different URLS.
So in order to avoid such confusion, you have to give priority to any one of the above version.
And need to use Canonical Tag to instruct the Search Bots accordingly that ” 1 URL is primary so you can index the content using that URL only “.
How To implement this?
It is very simple to implement this canonical tab and for this you just need to go to the backend (Dashboard)of your website.
- Go to Appearance tab and under this tab click on Theme Editor.
- In the right side you will find Theme Files.
- Under Theme files you will get header.php
- Just click on header.php and you will find the header section.
- Then in the coding part click on head you will see it will highlight the opening and closing head section.
- Just before the closing head section add this Canonical tab below.
<link rel=”canonical” href=”https://xyz.com/” />

Now After implementing this, Bots will definitely get which version is the right now.
So hope you find the above article Implement 7 Technical SEO Checklists To Optimize Your WordPress Website helpful and now its time to implement this in order to optimize your website technically. After implementing this you will definitely find better improvement.
And to know more about SEO then,
Must Explore: COMPLETE SEO CHECKLIST FOR 2021